

LVM Made Easy: Your Guide to Stress-Free Storage Management
Stretchable Storage management made simple with LVM

Let's learn together and serve the society, Make India Proud.
Hello everyone, In this article, we’re going to explore the complete landscape of Logical Volume Management (LVM), from the basics to the advanced concepts. We’ll journey from the very beginning to the end, ensuring a comprehensive understanding of LVM. The topics we’ll cover throughout this article are listed below. So, let’s dive in and learn together.
Introduction to LVM
Definition of LVM
Why LVM is popular?
LVM Architecture & their components
- How LVM works
Practical Guide ( Working with LVM )
Creating a Physical Volume (PV)
Creating a Volume Group (VG)
Creating a Logical Volume (LV)
File system formation
Access LVM partition through mount access point
Resizing LVM options: lvreduce and lvextend
Taking a snapshot of LVM and its uses
Restoring from a snapshot state
How to remove active PV from the LVM
Introduction to LVM
- Definition of LVM
LVM is like a magic box for managing storage on your computer. Imagine you have several small boxes (these are your physical storage devices like hard drives). Each box can hold a certain amount of stuff (data). But it’s hard to keep track of what’s in each box and moving stuff around if you need more space in one box is a hassle.
This is where LVM comes in. It allows you to put all these small boxes into one big box (this is called a Volume Group). Now, instead of seeing several small boxes, you see one big box. The best part is, you can create smaller, flexible partitions inside this big box (these are called Logical Volumes). You can name these partitions anything you like, such as “photos”, “documents”, etc.
The beauty of LVM is that these partitions are flexible. If you find that your “photos” partition is running out of space, you can easily make it bigger by taking some space from another partition. You can do all this while your computer is running, without needing to stop and restart it.
Let’s take an example. Suppose you have two hard drives of 500GB each. Without LVM, if you have partitioned one drive to hold 300GB of movies and it’s running out of space, you’d have to manually move some movies to the other drive. With LVM, you can simply add more space to your “movies” partition from the unused space of the second drive, all without moving any files around.

- Why LVM is popular then, traditional disks partitions schemes?
Logical Volume Management (LVM) is a method of allocating space on mass-storage devices that is more flexible than conventional partitioning schemes. In particular, an LVM system can:
Resize disk partitions: With traditional disk partitions, resizing is a complex task and sometimes not possible without data loss. However, LVM allows you to resize disk partitions easily and without data loss.
Manage storage more effectively: LVM allows you to create a logical volume that spans multiple physical disks. This is useful when you need more storage than a single disk can provide.
Snapshot capability: LVM provides snapshot capability. You can create a temporary copy of a logical volume and use it for backups. This is not possible with traditional disk partitions.
Dynamic allocation of storage: With LVM, you can allocate additional storage to a logical volume on the fly as your needs grow, without any downtime.
Let’s say you have a 500GB hard drive with a single partition that is running out of space. You add a new 500GB hard drive to your system. With traditional partitions, you would have to create a new partition on the new drive and then figure out how to distribute your data between the two partitions.
With LVM, you can add the new drive to a volume group, extend the logical volume to include the new drive, and then resize the file system, all without any downtime or data loss. The operating system sees this as one large 1TB drive, and you don’t have to worry about managing multiple partitions.
In short, while traditional disk partitions still have their uses, LVM provides a more flexible and powerful way to manage disk space. It’s particularly useful in enterprise environments where storage needs can change rapidly and downtime is costly.
LVM Architecture & their components
- How LVM architecture are working?
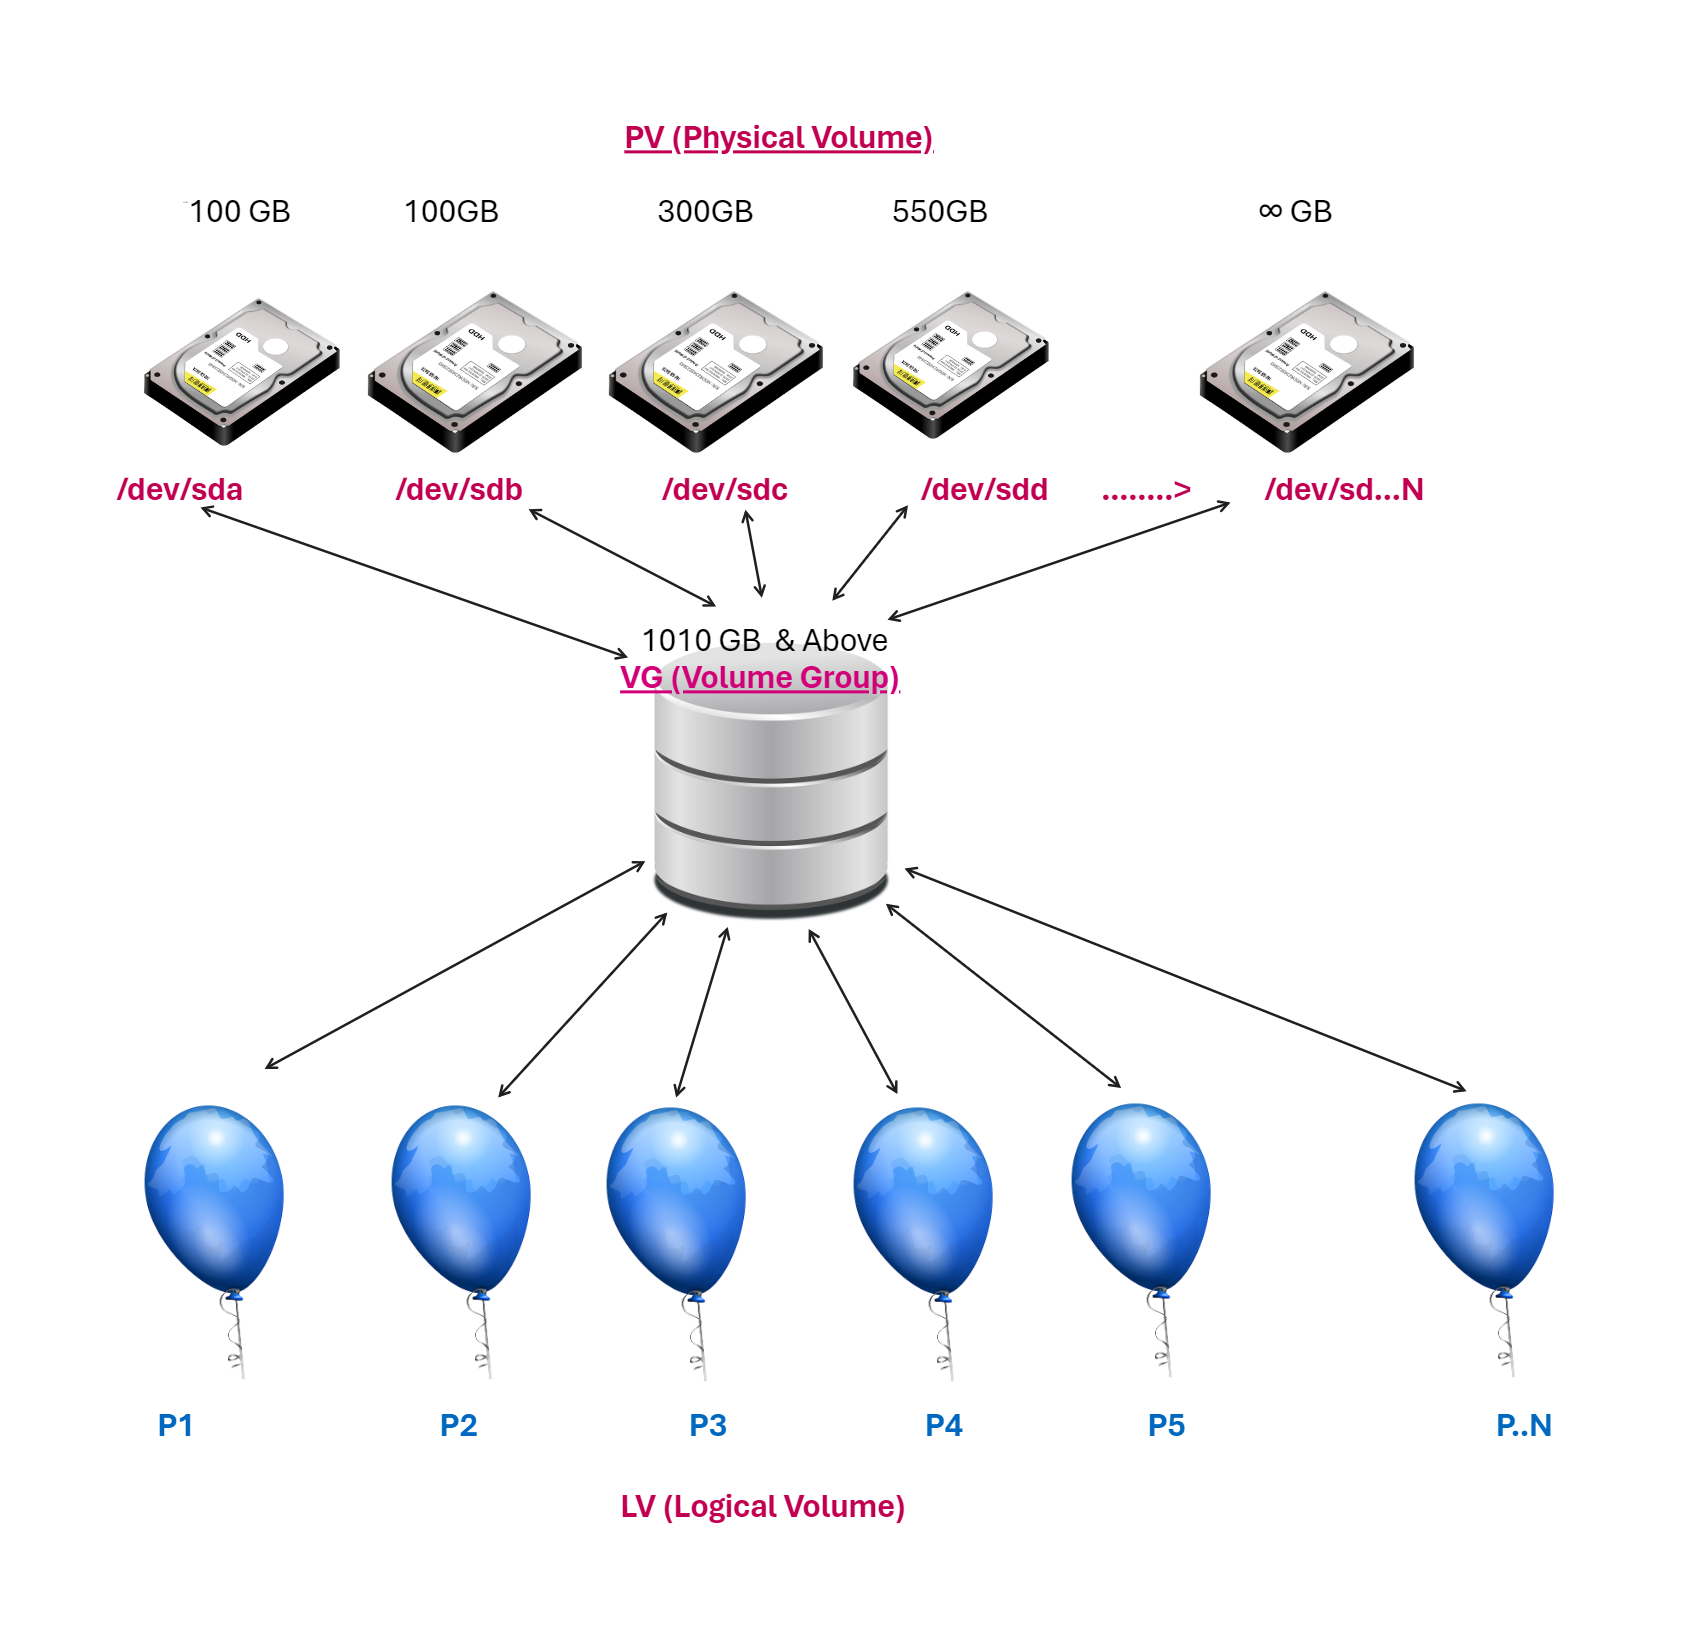
In LVM (Logical Volume Management) architecture, data is stored in a layered manner:
Physical Volumes (PVs): Data is first stored on physical storage devices, such as hard disks or SSDs. These devices, or specific partitions on these devices, are designated as PVs.
Volume Group (VG): The PVs are then grouped together to form a VG. The VG acts as a single large storage pool, combining the capacities of all the PVs it contains. Data isn’t directly stored on the VG, but the VG keeps track of which parts of the PVs are allocated to which LVs.
Logical Volumes (LVs): Within the VG, you create LVs. These LVs are where your data is actually stored. You can think of an LV as a ‘virtual partition’. It’s given a portion of the total VG space and can be formatted with a file system (like ext4 or XFS) where you can store your files and directories.
This layered approach allows for flexibility. For example, if an LV is running out of space, you can add a new PV to the VG and then extend the LV to use this additional space. Similarly, if you have unused space in your VG, you can create new LVs to utilize it. This is how data is stored and managed in LVM architecture.
Below image of LVM architecture :-
Practical Guide (Working with LVM)
Crating a Physical Volume (PV)
I have three disks partition sda, sdb, sdc with 100 GB storage each for this practical.
- List the block devices: You can use the
lsblkcommand to list all block devices, which should now include your new diskssda,sdb, andsdc.
$ lsblk
The output look something like this:
NAME   MAJ:MIN RM   SIZE RO TYPE MOUNTPOINT
sda      8:0    0   100G  0 disk
sdb      8:16   0   100G  0 disk
sdc      8:32   0   100G  0 disk
- Check the file system disk space usage: You can use the
df -hcommand to check the file system disk space usage.
$ df -h
- Create a Physical Volume (PV): You can use the
pvcreatecommand to create a new physical volume on each of your new disks.
"p" option.Create Persistent volume with three individual disks /dev/sda, /dev/sdb, /dev/sdc
$ sudo pvcreate /dev/sda
$ sudo pvcreate /dev/sdb
$ sudo pvcreate /dev/sdc
- List the Physical Volumes: You can use the
pvsorpvdisplaycommand for long detailed output to list all physical volumes.
$ sudo pvs
$ sudo pvdisplay
The output might look something like this:
  PV         VG        Fmt  Attr PSize   PFree
  /dev/sda            lvm2 ---  100.00g 100.00g
  /dev/sdb            lvm2 ---  100.00g 100.00g
  /dev/sdc            lvm2 ---  100.00g 100.00g
Creating a Volume Group (VG)
Now you have to create a volume group (VG) named vg_vol from these physical volumes (PVs): That is actually a combined volume space that have PV's space behind in reality.
- Create a Volume Group (VG): You can use the
vgcreatecommand to create a new volume group. Here’s how you can do it:
-s , for your Volume Group. This process will break down the entire volume into smaller chunks, each the size of your chosen Physical Extent. You can see this information by vgdisplay after vg creation.$ sudo vgcreate -s 2M vg_vol /dev/sda /dev/sdb /dev/sdc
Volume group "vg_vol" successfully created
This command creates a new volume group named vg_vol using the physical volumes /dev/sda, /dev/sdb, and /dev/sdc, and each Physical Extent size will be 2MB each block.
- List the Volume Groups: You can use the
vgsorvgdisplaycommand for long detailed output to list all volume groups.
$ sudo vgs

VG     #PV #LV #SN Attr   VSize   VFree
vg_vol   3   0   0 wz--n- 300.00g 300.00g
$ sudo vgdisplay
--- Volume group ---
  VG Name               vg_vol
  System ID
  Format                lvm2
  Metadata Areas        2
  Metadata Sequence No  1
  VG Access             read/write
  VG Status             resizable
  MAX LV                0
  Cur LV                0
  Open LV               0
  Max PV                0
  Cur PV                2
  Act PV                2
  VG Size               <300 GiB
  PE Size               2.00 MiB
  Total PE              153600
  Alloc PE / Size       0 / 0
  Free  PE / Size       153600 / <4.00 GiB
  VG UUID               vQqtJ2-cMLU-hHc2-AU1e-Uw1R-alWb-nOtxBi
This shows that the volume group vg_vol has been successfully created with 3 physical volumes, and it has a size of 300GB with 300GB free.
Creating a Logical Volume (LV)
Now you can create logical volumes (LVs) named lv_vol1, lv_vol2, and lv_vol3 from the volume group (VG) vg_vol:
- Create Logical Volumes (LVs): You can use the
lvcreatecommand to create new logical volumes. Here’s how you can do it:
NOTE: In the
lvcreatecommand in Linux,-Land-loptions are used to specify the size of the logical volume:
-Loption: This is used to specify the size in units such as kilobytes (K), megabytes (M), gigabytes (G), terabytes (T), etc. For example,-L 10Gwould create a logical volume of 10 gigabytes.
-loption: This is used to specify the size in extents. An extent is a block of space in the volume group. The size of an extent is defined when the volume group is created. For example,-l 100%FREEwould use 100% of the free space in the volume group.So, the basic difference is that
-Lspecifies the size in units of bytes, while-lspecifies the size in extents.
$ sudo lvcreate -n lv_vol1 -L 50G vg_vol
$ sudo lvcreate -n lv_vol2 -L 50G vg_vol
$ sudo lvcreate -n lv_vol3 -L 50G vg_vol

Logical volume "lv_vol" created.
Or you can do this. (Both option will create same amount of LV partition)
EX: Here 1 Physical Extent is 2 MB, then (1024 * 50)/2 = 25600 Physical Extent
$ sudo lvcreate -n lv_vol1 -l 25600 vg_vol
$ sudo lvcreate -n lv_vol2 -L 25600 vg_vol
$ sudo lvcreate -n lv_vol3 -L 25600 vg_vol

Logical volume "lv_vol" created.
These commands create three new logical volumes named lv_vol1, lv_vol2, and lv_vol3 each with a size of 50GB in the volume group vg_vol.
- List the Logical Volumes: You can use the
lvsorlvdisplaycommand for detailed output to list all logical volumes.
$ sudo lvs

  LV     VG     Attr       LSize   Pool Origin Data%  Meta%  Move Log Cpy%Sync Convert
  lv_vol1 vg_vol -wi-a-----  50.00g
  lv_vol2 vg_vol -wi-a-----  50.00g
  lv_vol3 vg_vol -wi-a-----  50.00g
$ sudo lvdisplay /dev/vg_vol/lv_vol1

  LV Path                /dev/vg_vol/lv_vol1
  LV Name                lv_vol1
  VG Name                vg_vol
  LV UUID                rdEpAG-7egK-08e4-SSWJ-1Ywx-hVvD-XbFlp0
  LV Write Access        read/write
  LV Creation host, time mh1.example.com, 2024-01-17 20:16:19 +0530
  LV Status              available
  # open                 0
  LV Size                50.00 GiB
  Current LE             25600
  Segments               1
  Allocation             inherit
  Read ahead sectors     auto
  - currently set to     256
  Block device           253:2
This shows that the logical volumes lv_vol1, lv_vol2, and lv_vol3 have been successfully created in the volume group vg_vol each with a size of 50GB.
File system formation
Now you can create ext4 file systems on these logical volumes (LVs) and check their details:
- Create ext4 File Systems: You can use the
mkfs.ext4command to create anext4file system on each of your logical volumes.
$ sudo mkfs.ext4 /dev/vg_vol/lv_vol1
$ sudo mkfs.ext4 /dev/vg_vol/lv_vol2
$ sudo mkfs.ext4 /dev/vg_vol/lv_vol3
- List the Block Devices: You can use the
lsblkcommand to list all block devices.
$ lsblk
The output might look something like this:
NAME           MAJ:MIN RM   SIZE RO TYPE MOUNTPOINT
sda              8:0    0   100G  0 disk
sdb              8:16   0   100G  0 disk
sdc              8:32   0   100G  0 disk
└─vg_vol       253:0    0   300G  0 lvm
  ├─lv_vol1    253:1    0    50G  0 lvm
  ├─lv_vol2    253:2    0    50G  0 lvm
  └─lv_vol3    253:3    0    50G  0 lvm
- Print Block Device Attributes: You can use the
blkidcommand to print the block device attributes.
$ sudo blkid

/dev/sda: UUID="3ef4-gh7j" TYPE="ext4"
/dev/sdb: UUID="4gh5-jk8l" TYPE="ext4"
/dev/sdc: UUID="5hj6-kl9m" TYPE="ext4"
/dev/vg_vol/lv_vol1: UUID="6jk73ekl9f4-gh7j-lm0n3ekl9f4-gh7j-" TYPE="ext4"
/dev/vg_vol/lv_vol2: UUID="7kl8kl9-mn3ef4-gh7j03ekl9f4-gh7j-o" TYPE="ext4"
/dev/vg_vol/lv_vol3: UUID="8lkl3ekl9f4-gh7j-93ef4-gh7jm9-no0p" TYPE="ext4"
- Check the File System Disk Space Usage: You can use the
df -hTcommand to check the file system disk space usage.
$ df -hT

Filesystem     Type      Size  Used Avail Use% Mounted on
/dev/sda       ext4      100G  10G   90G  10% /
/dev/sdb       ext4      100G  20G   80G  20% /mnt/data1
/dev/sdc       ext4      100G  30G   70G  30% /mnt/data2
/dev/vg_vol/lv_vol1 ext4 50G   5G    45G  10% /mnt/lv1
/dev/vg_vol/lv_vol2 ext4 50G   10G   40G  20% /mnt/lv2
/dev/vg_vol/lv_vol3 ext4 50G   15G   35G  30% /mnt/lv3
Access LVM partition through mount access point
We are going to create three mount points, namely lv-mount1, lv-mount2, and lv-mount3, in the /mnt location. After that, we will mount the logical volumes to these mount points. Finally, we will make entries in the fstab file for these mounts.
# Create mount points
$ mkdir /mnt/lv_mount1
$ mkdir /mnt/lv_mount2
$ mkdir /mnt/lv_mount3

# Mount the logical volumes
$ mount /dev/vg_vol/lv_vol1 /mnt/lv_mount1
$ mount /dev/vg_vol/lv_vol2 /mnt/lv_mount2
$ mount /dev/vg_vol/lv_vol3 /mnt/lv_mount3

# Make fstab entries for permanent after boot
$ echo "/dev/vg_vol/lv_vol1 /mnt/lv_mount1 ext4 defaults 0 0" >> /etc/fstab
$ echo "/dev/vg_vol/lv_vol2 /mnt/lv_mount2 ext4 defaults 0 0" >> /etc/fstab
$ echo "/dev/vg_vol/lv_vol3 /mnt/lv_mount3 ext4 defaults 0 0" >> /etc/fstab
And here is the output of the /etc/fstab file after the above operations:
$ sudo vim /etc/fstab

# <file system> <mount point>   <type>  <options>       <dump>  <pass>
/dev/sda        /               ext4    defaults        0       0
/dev/sdb        /mnt/data1      ext4    defaults        0       0
/dev/sdc        /mnt/data2      ext4    defaults        0       0
/dev/vg_vol/lv_vol1       /mnt/lv_mount1     ext4   defaults    0 0
/dev/vg_vol/lv_vol2       /mnt/lv_mount2     ext4   defaults    0 0
/dev/vg_vol/lv_vol3       /mnt/lv_mount3     ext4   defaults    0 0
$ sudo cp -arvf /var/* /mnt/lv_mount1/
$ sudo cp -arvf /boot/* /mnt/lv_mount1/
Check size of lv disk partition.
$ sudo du -h /mnt/lv_mount

.
. .
. . .
. . . .
4096M    /mnt/lv-mount1/
Resizing LVM options: lvreduce and lvextend
You can use the lvreduce and lvextend commands to resize LVM partitions:
- Reducing the size of an LVM partition (
lvreduce):
Before reducing the size of a logical volume, it’s important to ensure that the file system within the volume can also be reduced. For an ext4 file system, you can use the resize2fs command:
lvreduce, you’re reducing the amount of disk space allocated to that volume. If you do this without first reducing the size of the file system, you risk losing data because lvreduce does not care about the data stored within the volume. If you’re extending a logical volume, the order is reversed. You should use lvextend to extend the size of the logical volume first, and then use resize2fs to extend the file system to fill the newly-allocated space.On the other hand, resize2fs is a tool that knows how to safely shrink an ext4 file system. It will move any data residing on the blocks that are being removed to other parts of the file system.
# Unmount the logical volume
$ umount /mnt/lv-mount1

# Check the file system before resizing
$ e2fsck -f /dev/vg_vol/lv_vol1

e2fsck 1.46.5 (30-Dec-2021)
Pass 1: Checking inodes, blocks, and sizes
Pass 2: Checking directory structure
Pass 3: Checking directory connectivity
Pass 4: Checking reference counts
Pass 5: Checking group summary information
/dev/vgvol/lvvol2: 11/360448 files (0.0% non-contiguous), 44646/1441792 blocks
#Resize the file system
$ resize2fs /dev/vg_vol/lv_vol1 40G
#Reduce the size of the logical volume
$ lvreduce -L 40G /dev/vg_vol/lv_vol1

WARNING: Reducing active logical volume to 40.00 GiB.
THIS MAY DESTROY YOUR DATA (filesystem etc.)
Do you really want to reduce vg_vol/lv_vol2? [y/n]: y
Size of logical volume vg_vol/lv_vol2 changed from 5.50 GiB (282516 extents) to 200.00 MiB (100 extents).
Device vg_vol-lv_vol2-real (253:4) is used by another device.
Problem reactivating logical volume vg_vol/lv_vol2.
Logical volume vg_vol/lv_vol successfully resized.
#Remount the logical volume
$ mount /dev/vg_vol/lv_vol1 /mnt/lv-mount1
/dev/vg_vol/lv_vol1 now size is only 10G only.$ lsblk
NAME MAJ:MIN RM SIZE RO TYPE MOUNTPOINT
sda 8:0 0 100G 0 disk
sdb 8:16 0 100G 0 disk
sdc 8:32 0 100G 0 disk
└─vg_vol 253:0 0 300G 0 lvm
├─lv_vol1 253:1 0 10G 0 lvm
├─lv_vol2 253:2 0 50G 0 lvm /mnt/lv_mount2
└─lv_vol3 253:3 0 50G 0 lvm /mnt/lv_mount3
In this example, the size of lv_vol1 is reduced to 40GB and remaining size of lvm is 10G.
- Increasing the size of an LVM partition (
lvextend):
# Extend the size of the logical volume
$ sudo lvextend -L +10G /dev/vg_vol/lv_vol1
$ sudo lvextend -r -L +10G /dev/vg_vol/lv_vol1 #(-r option do resize at same time)

# Resize the file system
$ resize2fs /dev/vg_vol/lv_vol1   #(No use when you use -r option with lvextend)
In this example, the size of lv_vol1 is increased by 10GB.
$ lsblk

NAME           MAJ:MIN RM   SIZE RO TYPE MOUNTPOINT
sda              8:0    0   100G  0 disk
sdb              8:16   0   100G  0 disk
sdc              8:32   0   100G  0 disk
└─vg_vol       253:0    0   300G  0 lvm
  ├─lv_vol1    253:1    0    20G  0 lvm
  ├─lv_vol2    253:2    0    50G  0 lvm  /mnt/lv_mount2
  └─lv_vol3    253:3    0    50G  0 lvm  /mnt/lv_mount3
Increasing the size of an VG pool (
vgextend):Extending a Volume Group (VG) in LVM means adding more disks to give extra storage space to VG group. This allows you to handle more data without shutting down your system. It makes it easier to manage your storage and keeps everything running smoothly as your needs grow.
to extend the VG, we have to require some newly created PV disks. For example we have one more disk “/dev/sdd“, so add this PV into vg_vol
 $ vgextend vg_vol /dev/sdd
 Volume group "vg_vol" successfully extended
Taking a snapshot of LVM and its uses
Create a logical volume named origin from the volume group vg001:
💡Create a snap, when you create lvm$ sudo lvcreate -n lv_vol1 -L 50G vg_vol $ sudo lvcreate --size 1G --name lv_vol1_snap --snapshot /dev/vg_vol/lv_vol1 Logical volume "lv_vol1_snap" created.Create a snapshot logical volume named snap of
/dev/vg_vol/lv_vol1that is 1GB in size:#lvcreate --size 1G M --name snap --snapshot /dev/vg_vol/lv_vol1 $ Logical volume "snap" created.$ lsblk NAME MAJ:MIN RM SIZE RO TYPE MOUNTPOINT sda 8:0 0 100G 0 disk sdb 8:16 0 100G 0 disk sdc 8:32 0 100G 0 disk └─vg_vol 253:0 0 300G 0 lvm ├─lv_vol1 253:1 0 20G 0 lvm ├─lv_vol1_snap 254:1 0 20G 0 lvm ├─lv_vol2 253:2 0 50G 0 lvm /mnt/lv_mount2 └─lv_vol3 253:3 0 50G 0 lvm /mnt/lv_mount3💡You can also use the-Largument instead of using--size,-ninstead of using--name, and-sinstead of using--snapshotto create a snapshot. You can check snapshot in/etc/lvm/archive/location.$ cd /etc/lvm/archive/ $ ls -al total 60 drwx------. 2 root root 4096 Jan 17 17:28 . drwxr-xr-x. 7 root root 115 Jan 17 13:02 .. -rw-------. 1 root root 1887 Jan 17 12:26 vg_vol_snap_00000-733987744.vg -rw-------. 1 root root 2484 Jan 17 12:34 vg_vol_snap_00001-1752724781.vg -rw-------. 1 root root 3074 Jan 17 12:37 vg_vol_snap_00002-1278740074.vg -rw-------. 1 root root 3239 Jan 17 12:52 vg_vol_snap_00003-1110221396.vg -rw-------. 1 root root 3552 Jan 17 12:52 vg_vol_snap_00004-786463575.vg -rw-------. 1 root root 4308 Jan 17 12:53 vg_vol_snap_00005-1268100483.vg -rw-------. 1 root root 3532 Jan 17 12:53 vg_vol_snap_00006-1388604217.vg -rw-------. 1 root root 3550 Jan 17 12:54 vg_vol_snap_00007-730868741.vg -rw-------. 1 root root 3284 Jan 17 13:04 vg_vol_snap_00008-316161094.vg -rw-------. 1 root root 3688 Jan 17 13:04 vg_vol_snap_00009-1832259422.vg -rw-------. 1 root root 3661 Jan 17 17:28 vg_vol_snap_00010-1424043212.vg
How to remove active PV from the LVM
At times in a production environment, you may encounter issues with an active PV (Physical Volume). When this happens, the solution is often to replace it with a new disk. However, as an administrator, you must consider the data stored on the PV. So, what’s the correct approach?
Move the data from the removable PV to another available PV.
For example we are removing a PV named “/dev/sdb“
 $ pvmove /dev/sdb /dev/sda
   /dev/sdb: Moved: 0.39%
   /dev/sdb: Moved: 100.00%
Reduce the VG (Volume Group) size.
 $ vgreduce vg_vol /dev/sdb
   Removed "/dev/sdb" from volume group "vg_vol"
Safely remove the PV from the Volume Group.
 $ pvremove /dev/sdb
   Labels on physical volume "/dev/sdb" successfully wiped.


